

How To Draw Eyes In Profile
I've resisted writing this kind of post for a long time. In my feel, the type of instructional content found in endless books, blogs and YouTube videos with titles like How To Depict 'Ten' is usually oversimplified and misleading.
There are 2 reasons for this. Get-go, when you lot draw a portrait, things like the model's individual morphology, our perspective every bit the viewer, and the lighting environs are different in every instance, and tin greatly impact your decisions. Drawing well is usually more than complicated than just following a list of formulaic steps that don't take variables into account.
Second, thinking in terms of "how to depict eyes" – as if the optics are somehow privileged and separate from the residuum of the confront, head and body – breaks upward the figure into artificial categories. In truth, there's equally much structure to be observed on the model's cheek or forehead as in the eyes, only we tend to be unaware of that (there aren't many "How to Draw Foreheads" tutorials out at that place). Instead, we focus on "eyes", "nose" and "mouth" also much, and forget nigh everything else. Manufactures similar this brand me queasy because they seem to reinforce this way of thinking.
Nevertheless, drawing disarming eyes is something a lot of students struggle with, frequently unnecessarily. Nosotros tend to approach the eyes in our drawings with lots of anxiety because they're psychologically important to homo beings. It's as well where we look first in a portrait. Mess up the optics, and you're suddenly stuck with a "bad drawing", while the same degree of error in describing the cervix or chin may go unnoticed by about viewers. Information technology's non off-white, simply it'south the way information technology is.
In this post, I'll lay out the things I think about well-nigh when drawing eyes on a portrait. I'll effort to take some variables into business relationship, but recollect these instructions are not universal. There will be enough of times while drawing a model when you'll encounter problems not mentioned here. But that's what learning to draw portraits is like. As similar equally human being beings are to 1 another, there's all the same no one-size-fits-all instruction set for drawing eyes – or annihilation else. The way forward is to absorb what y'all tin from teachers you trust, but be prepared to arrange and improvise as you encounter unique problems… because you will.
So, let's get started.
Large Things First
This is adept advice for cartoon any subject area, non just eyes, because it's piece of cake to get bogged downwards in details when drawing something complicated. Eyelashes, wrinkles and subtle highlights are all fun to depict, simply are nothing merely distractions early on (ones I however succumb to from time to time). As students who've taken online courses at Vitruvian Studio already know, it'due south always advisable to work from "general" to "specific" while cartoon. In other words, establish the biggest, broadest shapes first, then subdivide them to arrive at the smaller, more specific characteristics.
Context is Of import
You don't have to be a comedian to know that when telling a joke, you can't but jump to the punchline. You have to "set it up" first. If yous don't, fifty-fifty the funniest joke in the globe won't quite work.
The same principle applies to drawing.
The biggest trouble with nearly "how to draw eyes" tutorials is that they bound too speedily to drawing… well… eyes – the eyelids, iris, pupil, etc – without first setting-upwardly a structural context for the middle. In other words, optics look the way they practise in function because of everything that surrounds them.
This means that we need to look beyond the boundaries of the centre itself to consider the broader middle region, including the bony structures of the forehead and brow, the cheekbones, and the nose.
1: Build the Middle Socket
The eyeball is ready deep within a cavity in the skull chosen the "orbit" – or more commonly, the "eye socket". Each center socket on the skull is bordered visually past 3 basic:
- The Frontal Bone across the peak, forming what'southward chosen the "forehead ridge"
- The Maxilla along the inside (medial) border and the lower medial corner
- The Zygomatic Basic, or cheek bones, along the outside (lateral) edge and lower lateral corner
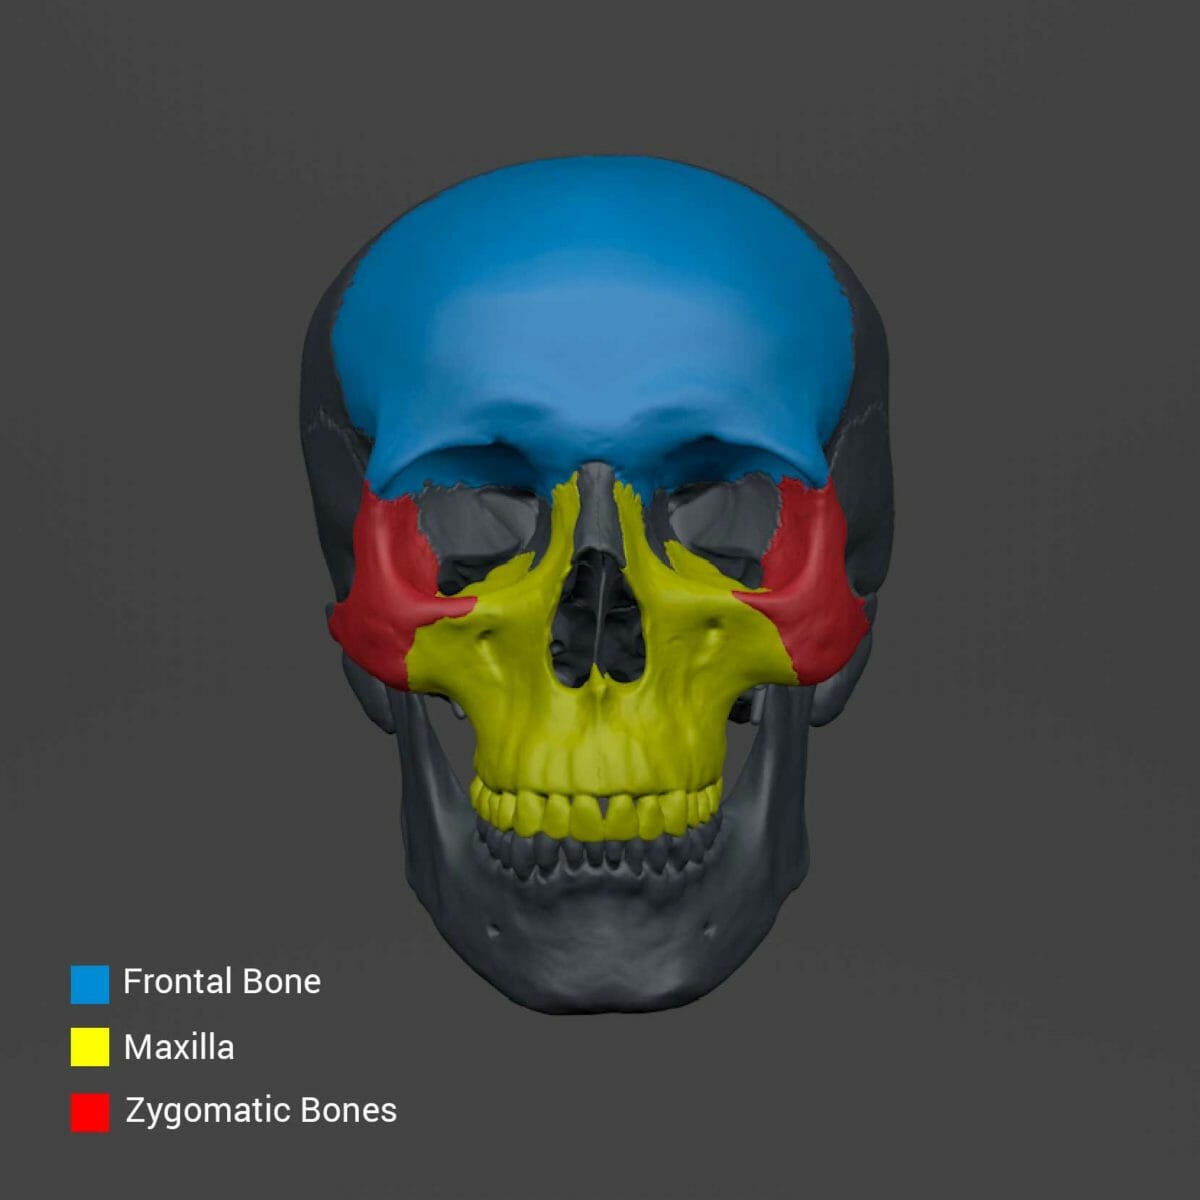
(In the forepart view, the nasal bones may appear to edge the centre socket, only they're actually prepare quite far forward of the orbital cavity, and so I oasis't listed them here.)
These three bones are what requite the eye socket its characteristic shape, which in the front view isn't actually round, but more than of a rhombus with rounded corners.
Starting with an HB pencil, lightly mark the boundaries of the eye socket on the page. Looking for certain landmarks will help you do this:
- The countenance: While information technology doesn't marking the top of the socket (that sits lower), the eyebrow is useful because information technology'south oft easy to come across and it marks a plane change where the brow ridge begins to turn down and in toward the center socket.
- The supraorbital margin: this is the bodily top border of the socket itself, and is ofttimes marked by a deep crease at the tiptop of the upper lid, where information technology folds on itself as information technology rolls up and under the forehead ridge, like a retractable canopy. This sharp definition is sometimes seen down the lateral side too, along the upper function of the zygomatic bone. (Due to the middle encompass fold, this crease isn't visible on individuals of asian descent.)
- The inner canthus, or "tear duct" at the inside corner of the eye, marks the medial (or within) edge of the eye socket.
- The infraorbital furrow marks the bottom boundary of the socket, and is oft seen on the surface equally a soft ridge running down and laterally from the within corner of the eye. Its trajectory echoes that of the forehead ridge above it.
Proceed it light! These lines are merely placeholders that you'll likely want to remove after. Don't blast them in! Depict lightly with the shoulder of the pencil pb to avoid gouging your paper.
2: Block-in the Shape and Position of the Eyelids
When blocking-in the eyelids, call up that they're stretched around the eyeball below them, which largely determines their shape. The trajectories of the lids every bit they arc across the eyeball are substantially cantankerous-contours on a sphere – like lines of latitude on a earth. On the eye, these trajectories aren't perfectly elliptical because they get pushed around by the cornea on the eyeball and the bony structures of the socket. Nevertheless, the eyeball is basically round, and that roundness is the biggest influence on the shape and path of the eyelids as they arc from corner to corner.
The nice thing about building the heart socket first is that information technology helps united states of america notice the outer boundaries of the lids:
- The top of the upper lid is defined by the top of the middle socket – the "supraorbital margin" – and follows its downward-lateral trajectory.
- The bottom of the lower lid sits just higher up the infraorbital furrow at the bottom of the eye socket, and also echoes its downwardly-lateral trajectory.
- The inside corner of the eye sits directly on the inside edge of the eye socket. We only need to decide how loftier or low it sits.
- The lateral corner of the eye is coincident with the supraorbital margin laterally as it turns downwards toward the zygomatic bone.

At this point it may exist noticeable that the eyeball sits surprisingly high inside the center socket, being tucked up and under the tiptop of the supraorbital margin.
Note:
Yous may be wondering why I don't suggest drawing the eyeball at this stage. Some tutorials advocate this, and it makes a certain corporeality of sense. After all, the eyeball fills much of the center socket we merely finished establishing, and is responsible for much of what we perceive equally the shape of the eye, so its influence is important.
I don't advise we draw the eyeball directly, however, because we see so little of information technology. Being mostly covered by the brow ridge and eyelids, the precise size and position of the eyeball in the socket can exist ambiguous at all-time. The trend is to draw the eyeball either too big or as well modest, and besides low in the socket, which can create problems for us downwardly the road.
Instead, let'south proceed past blocking in the parts of the eye we can actually meet (either direct or through their influence), starting with the larger, containing shapes. At this phase, with the eye socket already established, that ways drawing the eyelids.
The Orientation of the Center
Information technology's easy to presume that the centre, from corner to corner, sits horizontally on the head, only that's frequently not the instance. Usually, one of the two corners of the heart sits slightly higher than the other.
This can vary between individuals and with your angle of view on the model, but it's ever worth checking. Imagine a straight line connecting the two corners of the middle and determine its tilt. So endeavour to replicate that angle on the page as carefully equally you can.

About the Shape of Eyelids
The eyes are not shaped like footballs or almonds. And yet, this is one of the most common mistakes fabricated by students – and for that matter, many "how to draw optics" tutorials.
While information technology's true that the opening betwixt the lids tapers to a indicate on each side, that shape is also asymmetrical.
The Outer Boundaries:
Look for the "high point" – or noon – of the curve of the upper lid and you'll discover it sits somewhat medially (or toward the within). This is because the form of the hat follows the path of the supraorbital margin, which is angled downward, laterally.
The Inner Boundaries:
The outer and inner boundary of each eyelid echo one another, but they aren't parallel. The inner boundaries appear less curved when the optics are open because of perspective – they aren't rolled up or down over the eyeball as much as the outer boundaries, which makes the curvature announced less amplified from our angle of view.
It'due south also important to notation that in conventional portraiture, with a more-or-less heart-level view on the model, the upper lid ofttimes appears more rounded and the lower hat "flatter" (this isn't ever the case, but it happens oftentimes enough to be worth mentioning). The reason for this is simple. When the heart opens, the upper lid does virtually of the work, rolling upwards and over the eyeball, like an awning. The lower hat stays relatively stationary. This ways that the upper chapeau sits up on superlative of the eye when it is open, arcing up-and-over the round form of the eyeball, and thus actualization more than rounded from our point of view. The lower lid, by comparing, doesn't "whorl downwardly" very much, but rather pulls relatively straight across, appearing less curved from our betoken of view.
The Eyelids Have Thickness

Even in a line drawing, a single line is often inadequate for describing the construction of each eyelid. This is because the eyelids have thickness and we can oft see the top or bottom surface of the lids projecting outward from the surface of the eyeball. Including these planes in your drawing will help give your eyes dimension, making the eyeballs appear relatively recessed into the eye sockets – which they are.
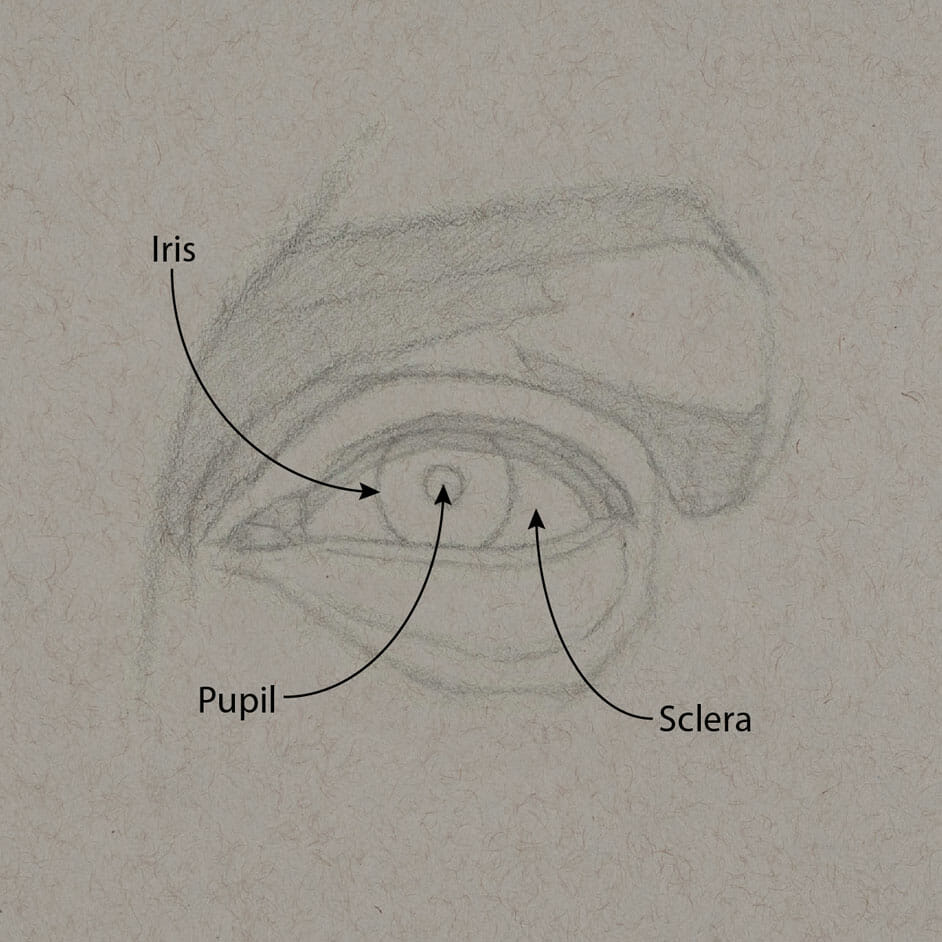
3: Adding the Iris and Pupil
With respect to cartoon the physical eyeball, there are 4 components we demand to consider:
- The pupil is basically but a hole in the eyeball allowing for the ingress of light.
- The iris is a pigmented disc that surrounds the student, featuring a complicated machinery that allows the aperture to expand or contract.
- The cornea is a raised, transparent dome-like construction that sits on acme of the educatee and iris.
- The sclera comprises the remaining surface of the eyeball and is what we commonly refer to equally the "white of the eye"
Scale
Students often struggle with finding the appropriate scale for the iris and pupil. The tendency is to describe them also big, filling upwardly too much of the space betwixt the eyelids, which tin brand a portrait look infantile or like an anime grapheme.
A popular dominion of thumb is that the size of the iris is about ⅓ that of the whole eyeball. This is roughly true, simply it's also catchy to apply. We don't meet the full width of the eyeball because much of it is covered past the bones and eyelids, and then determining ⅓ of that altitude usually involves some guess piece of work. Then keep the thirds rule in heed, merely besides try to observe the proportion of iris to sclera visible on the middle from your point of view. If the iris is too large on your cartoon, the infinite available for the sclera will be too pocket-sized.
Shape
When viewing the middle from the front, the iris and educatee appear round… or at to the lowest degree close. Y'all may occasionally notice on some individuals that these shapes aren't perfectly circular, but it'southward wise to depict them as circles anyway. Otherwise, it may look similar a weird drawing error.
If the model'southward gaze is turned abroad from you lot, however, the circles of the iris and pupil volition become elliptical. For a comprehensive procedure for drawing ellipses correctly, check out our Cartoon Basics course!
The Iris is a Lite Bucket
An of import feature of the iris that's ofttimes overlooked is that it has depth. The outer rim of the iris sits flush with the surface of the sclera, simply the inner aperture of the pupil is set somewhat inward. This gives the iris a noticeable "bucket" or "lampshade" structure (or "similar the laser canon on the Death Star" as one student aptly put information technology.) This inverted shape has of import consequences for our calorie-free and shade development, as we'll run into later.
The Cornea
Roofing the iris and pupil is a transparent dome chosen the cornea, which assists in focusing light into the eye. Call up of the cornea every bit being like a contact lens sitting on the forepart of the eyeball. It isn't directly visible considering it's run across-through, but information technology'due south influence is: highlights seen on the eyeball often sit on the cornea, partially obscuring the iris and educatee, because the cornea projects forward.
This forward projection of the cornea also has an influence on the shape of the upper eyelid. Depending on the direction of the model's gaze, the hat may get pushed up and outward over the "bump" of the dome-shaped cornea. This tin influence where nosotros perceive the loftier indicate of the upper lid to exist every bit it arcs over the eyeball.
And Now The Fun Function: Light & Shade
With the linear structure established, it'due south time to transition toward light and shade development. This is where we build upon the work nosotros've done to make the eye appear convincingly illuminated and three-dimensional.
You lot may have already completed (or partially completed) he first footstep toward this goal: drawing the shapes of the shadows. This helps us in the linear stage in getting positions and proportions right, but information technology's also how we begin to indicate the different orientations of planes on the middle. If we practise this correct, nosotros can create a rudimentary sense of grade with just 2 values: one for the low-cal side and one for the shadow. This binary statement is chosen a "poster".
Call up of the light masses and shadow masses as being like puzzle pieces – they should fit together perfectly. The border between these puzzle pieces is what we phone call the "shadow border" or "terminator". The terminator is what we're going to draw at this stage with a soft line as it bumps over the diverse forms of the eye region.
As y'all carve out the shapes of various shadows on and around the eye, hatch them down lightly with an HB pencil. This will assistance you run across if your shadow shapes are correct.
A Annotation virtually Lighting:
This is the stage where poor reference material can really cause you problems. A lot of studio photography uses multiple light sources with large diffusers to fill shadows and make blemishes and wrinkles harder to come across. The effect can be flattering, but it's also flattening. Without any shadows, there's picayune to tell your brain what planes are oriented in what direction, and then creating the illusion of 3-dimensional form in your drawing is well-nigh impossible without lots of invention.
To solve this problem, draw from life when possible. If drawing from life isn't an selection, e'er ask yourself this question when choosing a photograph reference: "Where is the primary light source in this picture?". If you can't tell, continue looking for a meliorate photo, or take i yourself!
iv: Reference Values
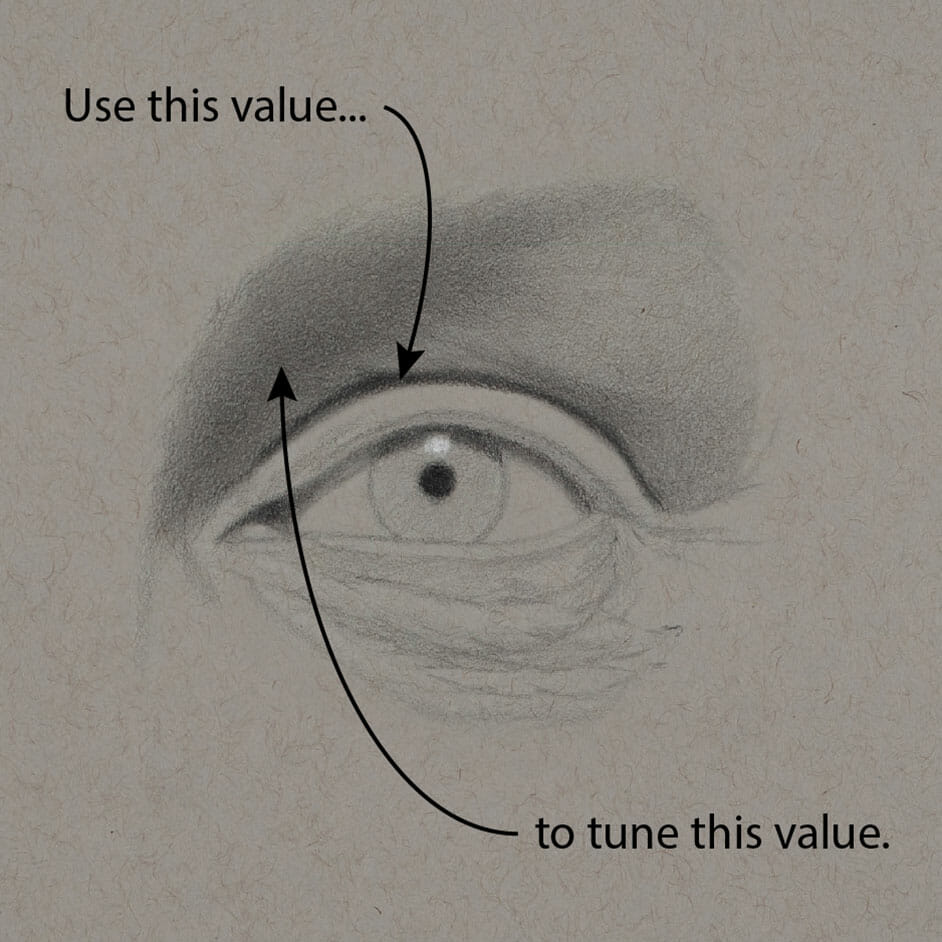
Before beginning the total light and shade development on the centre (or on anything), we beginning demand to set the range of values. This is important because "light" and "dark" are relative. Nosotros can only determine how light or dark something should exist in comparison to the lightest low-cal and darkest dark. Nosotros call these "reference values". I liken the role of these values to that of the oboe when tuning an orchestra – all the music that is to follow is tuned relative to that.
The darkest darks in the eye region are predictably constitute in a few places (bold the light is traveling from higher up). The deep crease of the upper lid forth the supraorbital margin is one candidate. The pupil of the eye is another (assuming it'south not obscured by any reflections on the cornea).
The lightest lights are commonly observed on the up-turned surfaces of either hat, or perhaps in a highlight on the cornea or sclera. Highlights are reflections of the lite source, later all, and so they tend to be quite bright.
5: Tuning "Chords"
With the reference values in identify, it's time to begin "tuning" the values of nearby areas, carefully gauging the "interval" between different notes. This tin be tricky to practice well – at least if you're new to this thought – but hither are a few tips to help you out:
- Work adjacent areas. Don't hop all around your drawing at this stage. Information technology's easier to judge value relationships when they're right next to each other.
- Tune small intervals first. Information technology's easier to judge small intervals than larger ones. With the darkest dark established, await for the adjacent darkest nearby value and develop that first.
- Work beyond boundaries. Don't permit the names of things confine you. If you're working in the iris/pupil area, be sure to develop nearby values on the sclera and the lids, too. Don't try to complete anything before you've integrated information technology with the surrounding value structure.
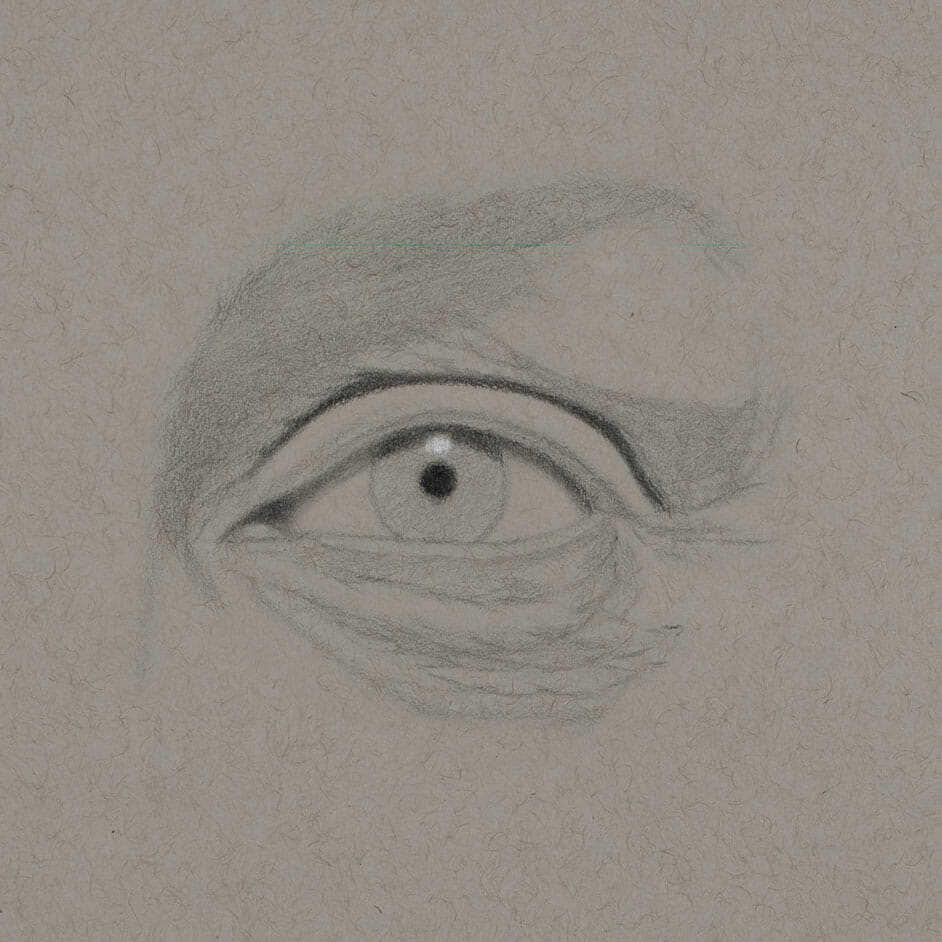
six: Modeling Forms
At this stage, your cartoon may resemble a patchwork quilt, with a few clusters of different values tuned to each other. Information technology'south now fourth dimension to brainstorm organizing these flat notes of value into progressions – or gradients – that get darker or lighter as the grade turns away from or toward the master calorie-free source.
Remember that the eyeball is a sphere. The lids follow the curvature of that sphere as they arc beyond the heart from one corner to the other, meaning the orientation of these surfaces relative to the light source is constantly changing. In gild for our drawing to announced iii-dimensional, it'due south necessary to draw the "turning" of these surfaces with gradual changes in value running in unlike directions.
To some extent, this can be washed visually – just compare your cartoon with your reference and endeavor to lucifer the value relationships you come across. Just it's also necessary to consider the direction of the light. Past this I hateful thinking in a 3-dimensional way, considering the relative orientation of different planes to the light source. Bold a consistent local value and distance to the light source, surfaces that face the low-cal more direct should be lighter than those the face the light less directly. Being aware of this can help convey value changes that you may not notice visually – the difference in value betwixt one office of the grade and another may be very subtle, but important nonetheless.
A practiced case of this can be seen on the iris. Call back the "bucket shaped" construction of the iris I referenced before? This has a big influence on the values nosotros use in this area because the planes are inverted. The lightest role of the iris is at the bottom where the surface faces up toward the light, and the darkest part is at the top – exactly the opposite of what we see on the sclera and the eyelids. The orientation of a given surface to the light matters. A lot.
As you lot develop your values, try to recollect virtually "sculpting" the form as you lot go. This is why nosotros typically refer to this phase as "modeling" rather than "shading". The goal here is to uses gradients and progressions of value to gently "turn" the surface of the form up toward the low-cal (lighter) or downwards and abroad from it (darker). It can assist to imagine while drawing that your pencil is a tiny clay tool, pushing and pulling the surface of a petty virtual sculpture that sits behind the moving-picture show plane. Thinking this way can help you fine-tune your values, and free y'all from the tyranny of merely "copying" what you see – which usually doesn't produce the all-time results.
seven: Eyelashes, Highlights and Other Details
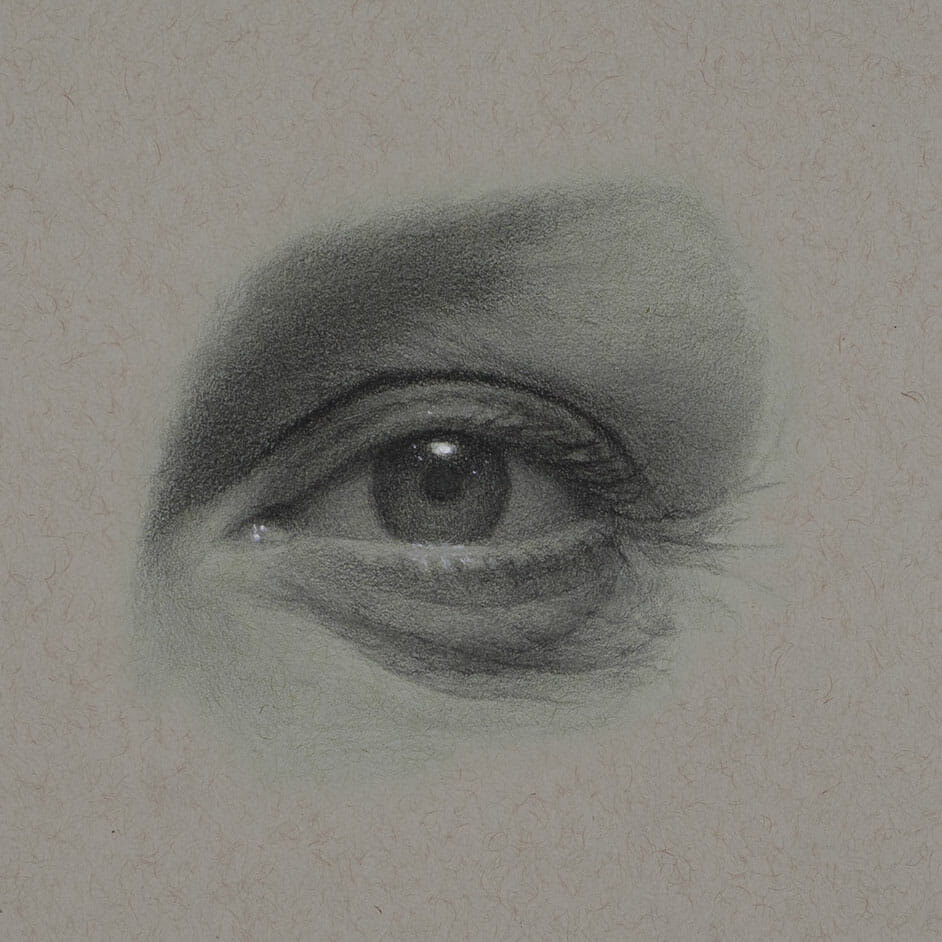
Once you've developed the major forms on your cartoon, you lot're virtually at the stop line. What remains is to observe some of the smaller details and describe those too, integrating them into the broader value construction you've already established.
But first, I should say that you don't actually have to practice this. I got a scrap ahead of myself and adult some of the wrinkles under the lower lid already, only y'all could opt to simplify your cartoon by not getting quite and so granular. Contrary to pop belief, more "details" isn't always better in realism. Instead, it tin can result in a look that'due south merely likewise choppy and decorated. On the other hand, details can be fun to depict, and so practise what feels right.
Eyelashes
Groupings
Eyelashes sometimes cause problems for students in a mode similar to cartoon pilus: we tend to think of them as private hairs and fail to notice that hair ordinarily congregates into groups.
Think of it this way: if you lot were a sculptor, you wouldn't model the hair on a portrait bust past rolling out thousands of little spaghettis of clay and adding them one at a time. Instead, you would sculpt the overall shape of the hair mass. The effect of private hairs would be a very minor detail, probably saved for the very terminate, if you included them at all.
We should try to handle hair of whatsoever kind in a similar way while drawing, including the eyelashes. Don't draw individual lines for each lash. Instead, try to discover how the lashes grouping together. Sometimes, if your model is further away, they can be seen as a unmarried ribbon-like form along the border of the upper lid. In other cases, such as when your model is wearing mascara, the lashes tend to clump together, forming a number of spikey points, like curved daggers, jutting out from the eyelid.
Orientation
It'southward besides important to consider the orientation of the eyelashes equally they protrude from the border of each lid. Recall, the eyeball is curved, and the eyelids along with them. Eyelashes near always project outward from the heart, roughly perpendicular to the surface of the eyeball. So, lashes that are set up in the center of the eyelid will projection roughly forwards. But as the eyelid wraps around the eyeball, its surface changes orientation. Approaching the lateral corner of the eye, the lashes will appear to project somewhat sideways, but still perpendicular to the surface of the eyeball (or close).
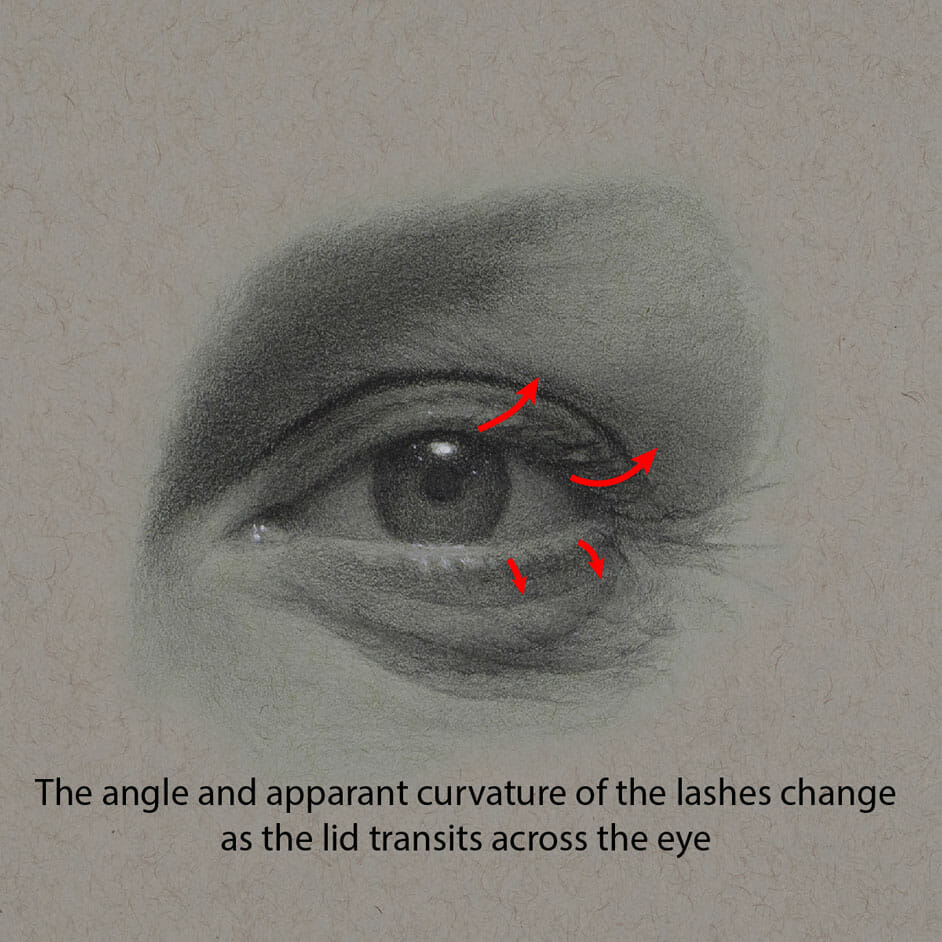
Curvature
Eyelashes are never directly, but curved. The trajectory of the upper lashes projects outward from the bottom edge of the eyelid, but then curves gently upward toward the tips. This consequence is even more than pronounced if your model is wearing mascara or fake eyelashes, in which case the curved sweep of the lashes will be unmistakeable.
Highlights
Highlights are just tiny reflections of the light source bounced off the surface of a form. They're non always clearly visible, just when they are, information technology's usually on smooth, sleeky surfaces… like an eyeball.
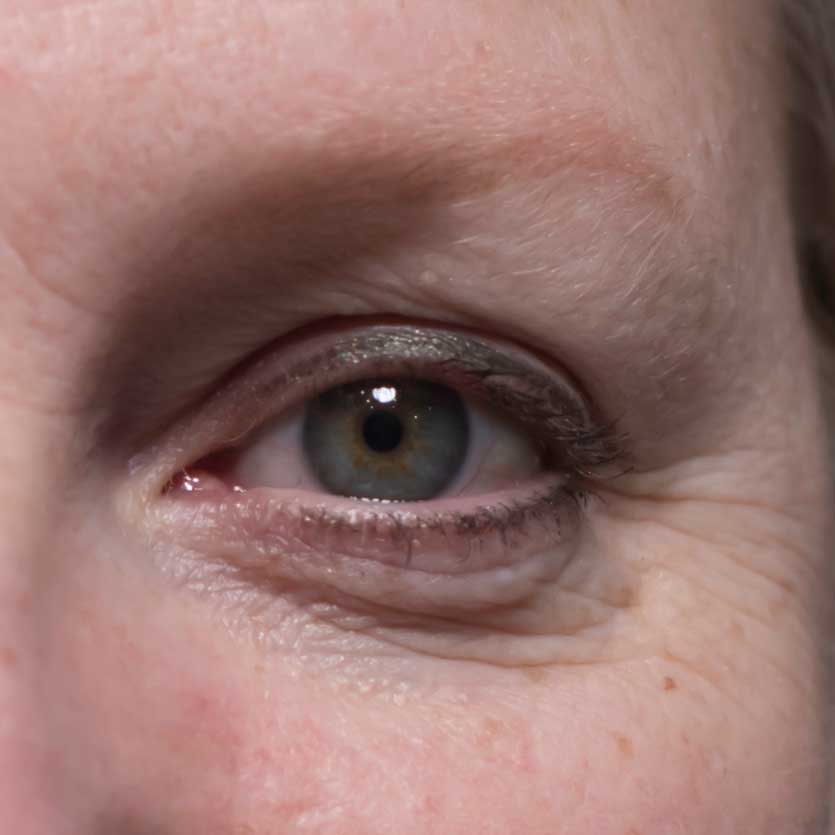
A highlight volition be visible on the eyeball when the incident rays from the light source bounciness off its surface at only the right angle toward the eye of the viewer. In this example, there is a pretty stiff highlight simply above the pupil. Only there are other, smaller, dimmer highlights to exist seen in on the slick surfaces of the inner canthus and along the top of the lower lid where it meets the wet surface of the eyeball.
Depending on how bright the highlights are, and the value of your paper, you may find it necessary to utilise some white chalk to go the right value. In this case, because the surrounding value of the iris is so dark, I began past erasing any graphite in the area first, and then applied chalk opaquely with a abrupt Full general'south Charcoal White pencil. The other, dimmer highlights were likewise applied with the chalk pencil, but less opaquely.
Other Details
At this bespeak, y'all may be washed cartoon the eye. Including surface details like wrinkles and pores in the peel oftentimes isn't necessary, and tin even backbite from your drawing if they're mishandled.
If you practise choose to pursue this level of description, be aware that many of the wrinkles or "crows feet" we see around the eye are gear up perpendicular to to the muscle fibers of the Orbicularis Oculi, which travel around the middle region in concentric circles. When these muscle fibers contract, they crusade the the heart to scrunch up – similar the draw string in a hoodie – causing wrinkles to radiate outward, cutting across their round path.
The skin under the eye, between the lower lid and the infraorbital furrow, is quite soft and sensitive. It tin can evidence variations in color, such as redness or subtle violet tones. Every bit we age, this area tin also be a locus of small-scale wrinkles as sagging skin collects above the rigid bottom edge of the eye socket.
If you cull to depict those wrinkles as I did, but call up that minor features on the skin are forms, only similar the larger ones, and every form has a light side and a dark side. Students often get astray when cartoon wrinkles past focusing likewise much on the grooves in the skin, drawing them as lines on the folio. But it's important to recollect that near texture nosotros might effort to depict – including on the skin – is just an organization of peaks and valleys.
Those grooves we see in wrinkles are depressions in the surface – footling ruts and ravines that run betwixt an arrangement of puckering fullnesses that projection outward, each catching the light in its ain way. These small but total forms between the wrinkles are what you desire to focus on, describing the light side and nighttime side of each. Do that inside an appropriate range of values, and the "wrinkles" will almost draw themselves.
Conclusion
For as much information every bit I've included in this mail, information technology'south still not comprehensive. At that place's a huge variety of homo faces out there, and everyone'southward eyes are a fiddling fleck unlike. Add together to that different perspectives and lighting conditions, and there is only no single arroyo to drawing eyes that is correct or consummate.
Ultimately, the all-time fashion to draw better eyes is to describe lots of them – do is the key to honing any skill, including drawing. So I hope you find the information presented hither helpful every bit you lot work to develop your drawing skills.

Source: https://vitruvianstudio.com/how-to-draw-better-eyes/
Posted by: robbfarome.blogspot.com
0 Response to "How To Draw Eyes In Profile"
Post a Comment